
Ajax
基础
Ajax俗称 异步JavaScript与XML
- 能够轻松实现页面与服务器的交互
- 用户场景:注册时检测用户名,搜索提示,
使用
jQuery中的Ajax
原生的Ajax使用起来较为复杂,jQuery对其进行了一次封装,用起来稍微简单些
$.get()
这个函数专门用于发送get请求
$.get(url,[date],[callback])-url-参数-请求成功的回调函数
<button id="btnGET">点击发送GET请求</button>
<script>
    $(function() {
        $('#btnGET').on('click',function() {
            $.get('http://www.liulongbin.top:3006/api/getbooks',function(res) {
                console.log(res);
            });
        })
    })
</script>
<button id="btnGET"></button>
<script>
    $(function() {
        $('#btnGET').on('click',function() {
            $.get('http://www.liulongbin.top:3006/api/getbooks',{id: 1},function(res) {
                console.log(res);
            });
        })
    })
</script>
$.post()
这个函数用于发送post请求的
<button id="btnPOST">点击新增</button>
<script>
$(function() {
$('#btnPOST').on('click',function() {
$.post('http://www.liulongbin.top:3006/api/addbook',
{bookname: '水浒传',
author: 'Jsckot',
publisher: 'xxx'
},
function(res) {
console.log(res);
})
})
})
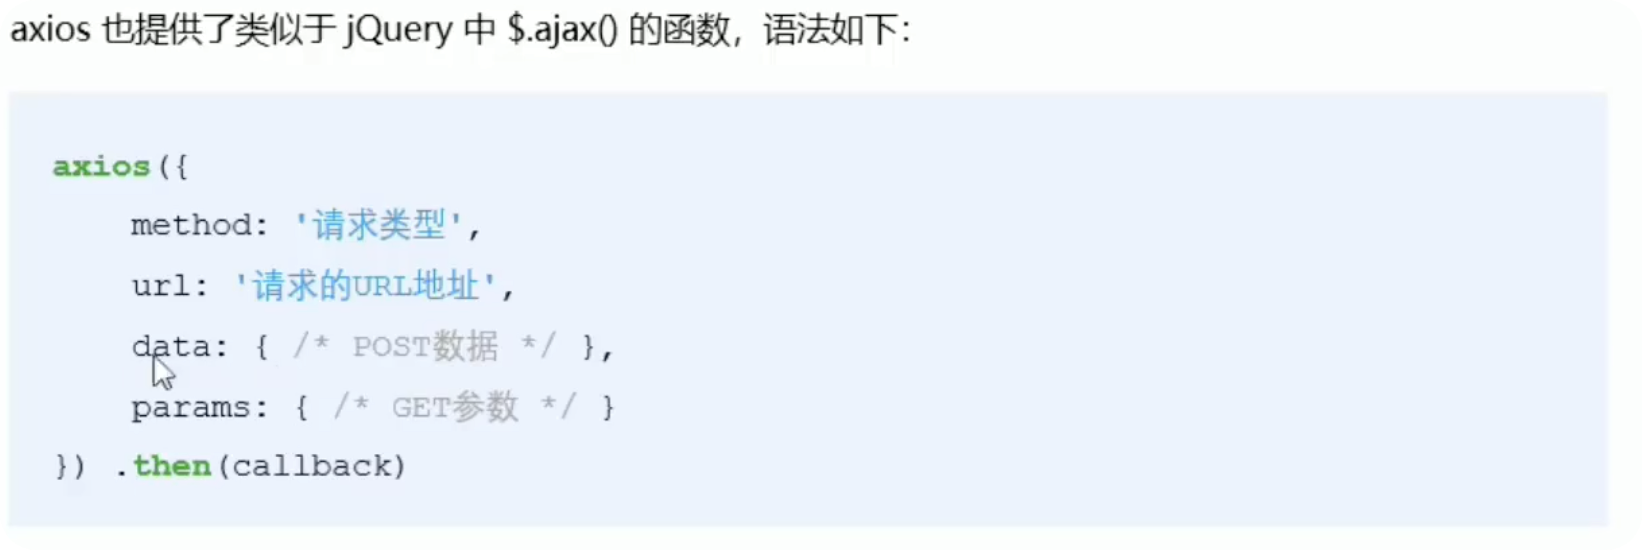
</script>$.ajax()
这个就是jQuery所带的Ajax请求,比较综合
Ajax的GET请求与POST请求比较类似
$.ajax({
  type: '',   //请求类型,GET/POST
  url: '',   //请求的url
  data: {},  //这次请求所携带的参数
  success: function(res) { }  //请求成功后的回调函数
})
<button id="btnAjax">点击发送Ajax请求</button>
<script>
    $(function() {
        $('#btnAjax').on('click',function() {
            $.ajax({
                type: 'GET',
                url: 'http://www.liulongbin.top:3006/api/getbooks',
                data: {id: 1},
                success: function(res) {
                    console.log(res);
                }
            })
        })
    })
</script>
监听表单提交事件
如下所示
<body>
  <form action="/login" method="get" id="ip">
  <input type="text" name="" id="">
  <input type="password" name="" id="">
  <button>SUBMIT</button>
  <script>
      $(function() {
          $('#ip').on('submit',function() {
              alert('监听成功!');
          })
      })
  </script>
</form>
组织表单提交默认行为
表单提交默认行为就是点提交后会自动跳转和提交
<body>
  <form action="/login" method="get" id="ip">
  <input type="text" name="" id="">
  <input type="password" name="" id="">
  <button>SUBMIT</button>
  <script>
      $(function() {
          $('#ip').on('submit',function(e) {
              e.preventDefault();
          })
      })
  </script>
  </form>
</body>
使用serialize()获取表单提交数据
使用这个之前一定要下面几种设置
- 表单添加id
- 每个表单项添加name属性
<body>
  <form action="" id="fm1">
      <input type="text" name="username" id=""><br>
      <input type="password" name="password" id=""><br>
      <button>submit</button>
  </form>

  <script>
      $(function() {
          $('#fm1').on('submit',function(e) {
              e.preventDefault();
              var data = $(this).serialize();
              console.log(data);
          })
      })
  </script>
</body>
模板引擎
不多讲
XMLHttpRequest
封装了get,post,ajax请求
- 创建xhr对象
- 调用open函数
- 设置Content-Tyle属性-POST必须写,GET不需要
- 调用send函数发送请求
- 监听onreadystatechange事件
<script>
    var xhr = new XMLHttpRequest();
    xhr.open('GET','http://www.liulongbin.top:3006/api/getbooks');
    xhr.send();
    xhr.onreadystatechange = function() {
        console.log(xhr);
    }

</script>
FormData
文件上传进度
用到xhr的upload.onprogress属性
动态上传可以使用bootstarp
jQuery实现
方便些
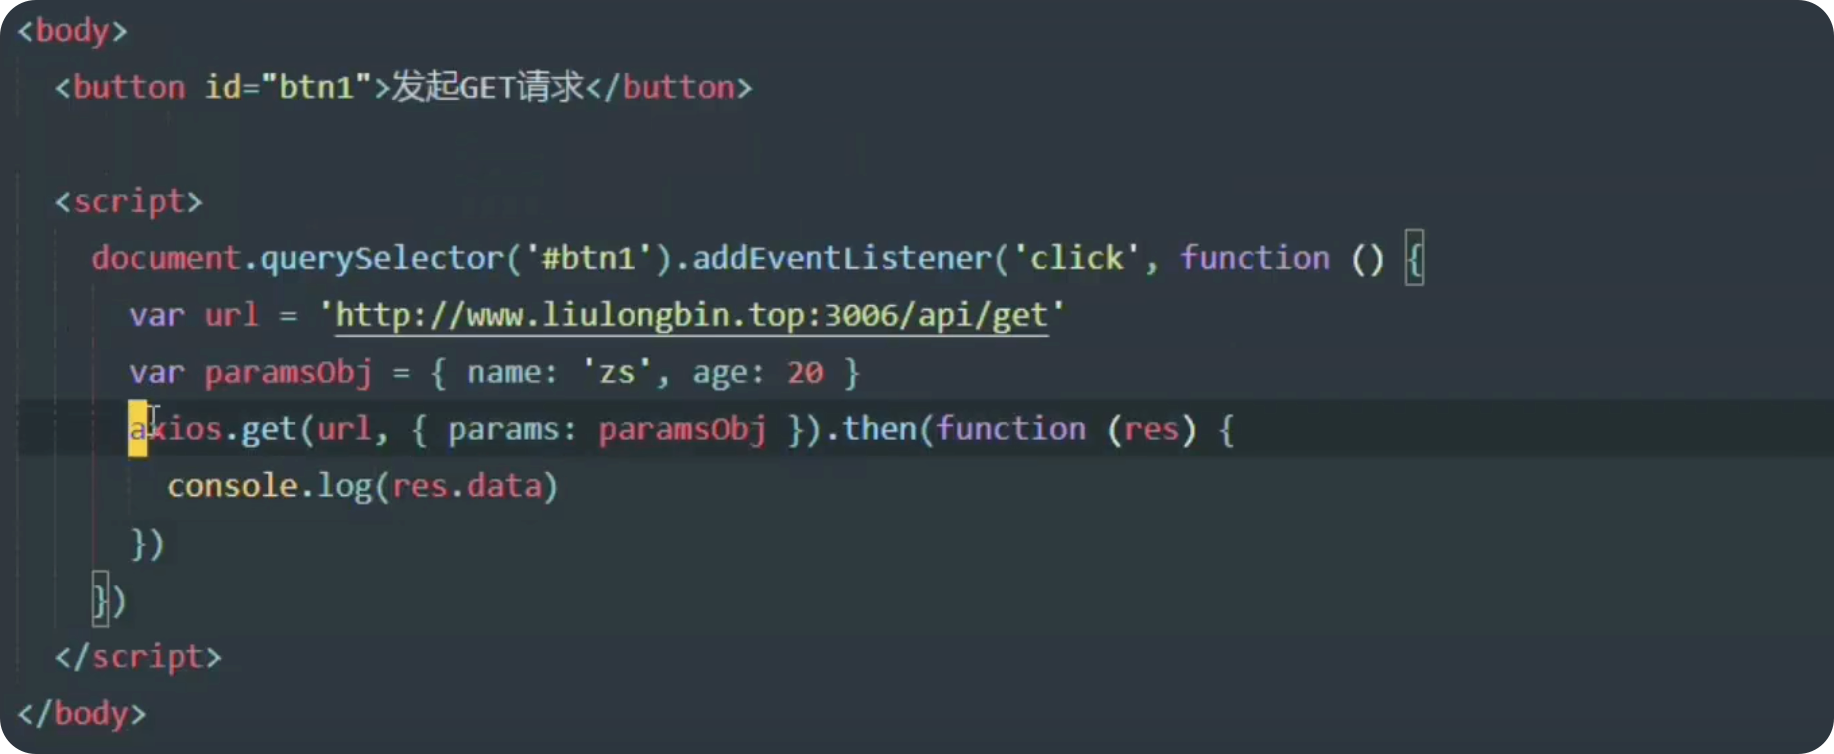
Axios
它是一个专注网络请求的库,体积小很多,相比原生的XHR,这个更方便易用


本博客所有文章除特别声明外,均采用 CC BY-NC-SA 4.0 许可协议。转载请注明来自 Jsckot的个人博客!
 微信
微信 支付宝
支付宝