
RabbitMQ实战
基础
通讯
通讯分为同步和异步
- 同步就相当于是微信视频,实时更新,两个人只能够单线
- 异步就相当于微信聊天,不用实时回复,也可以同时和很多个人发消息
同步问题
- 同步调用在微服务中存在很多问题
- 耦合度高
- 性能下降
- 资源浪费
- 级联失败
异步调用
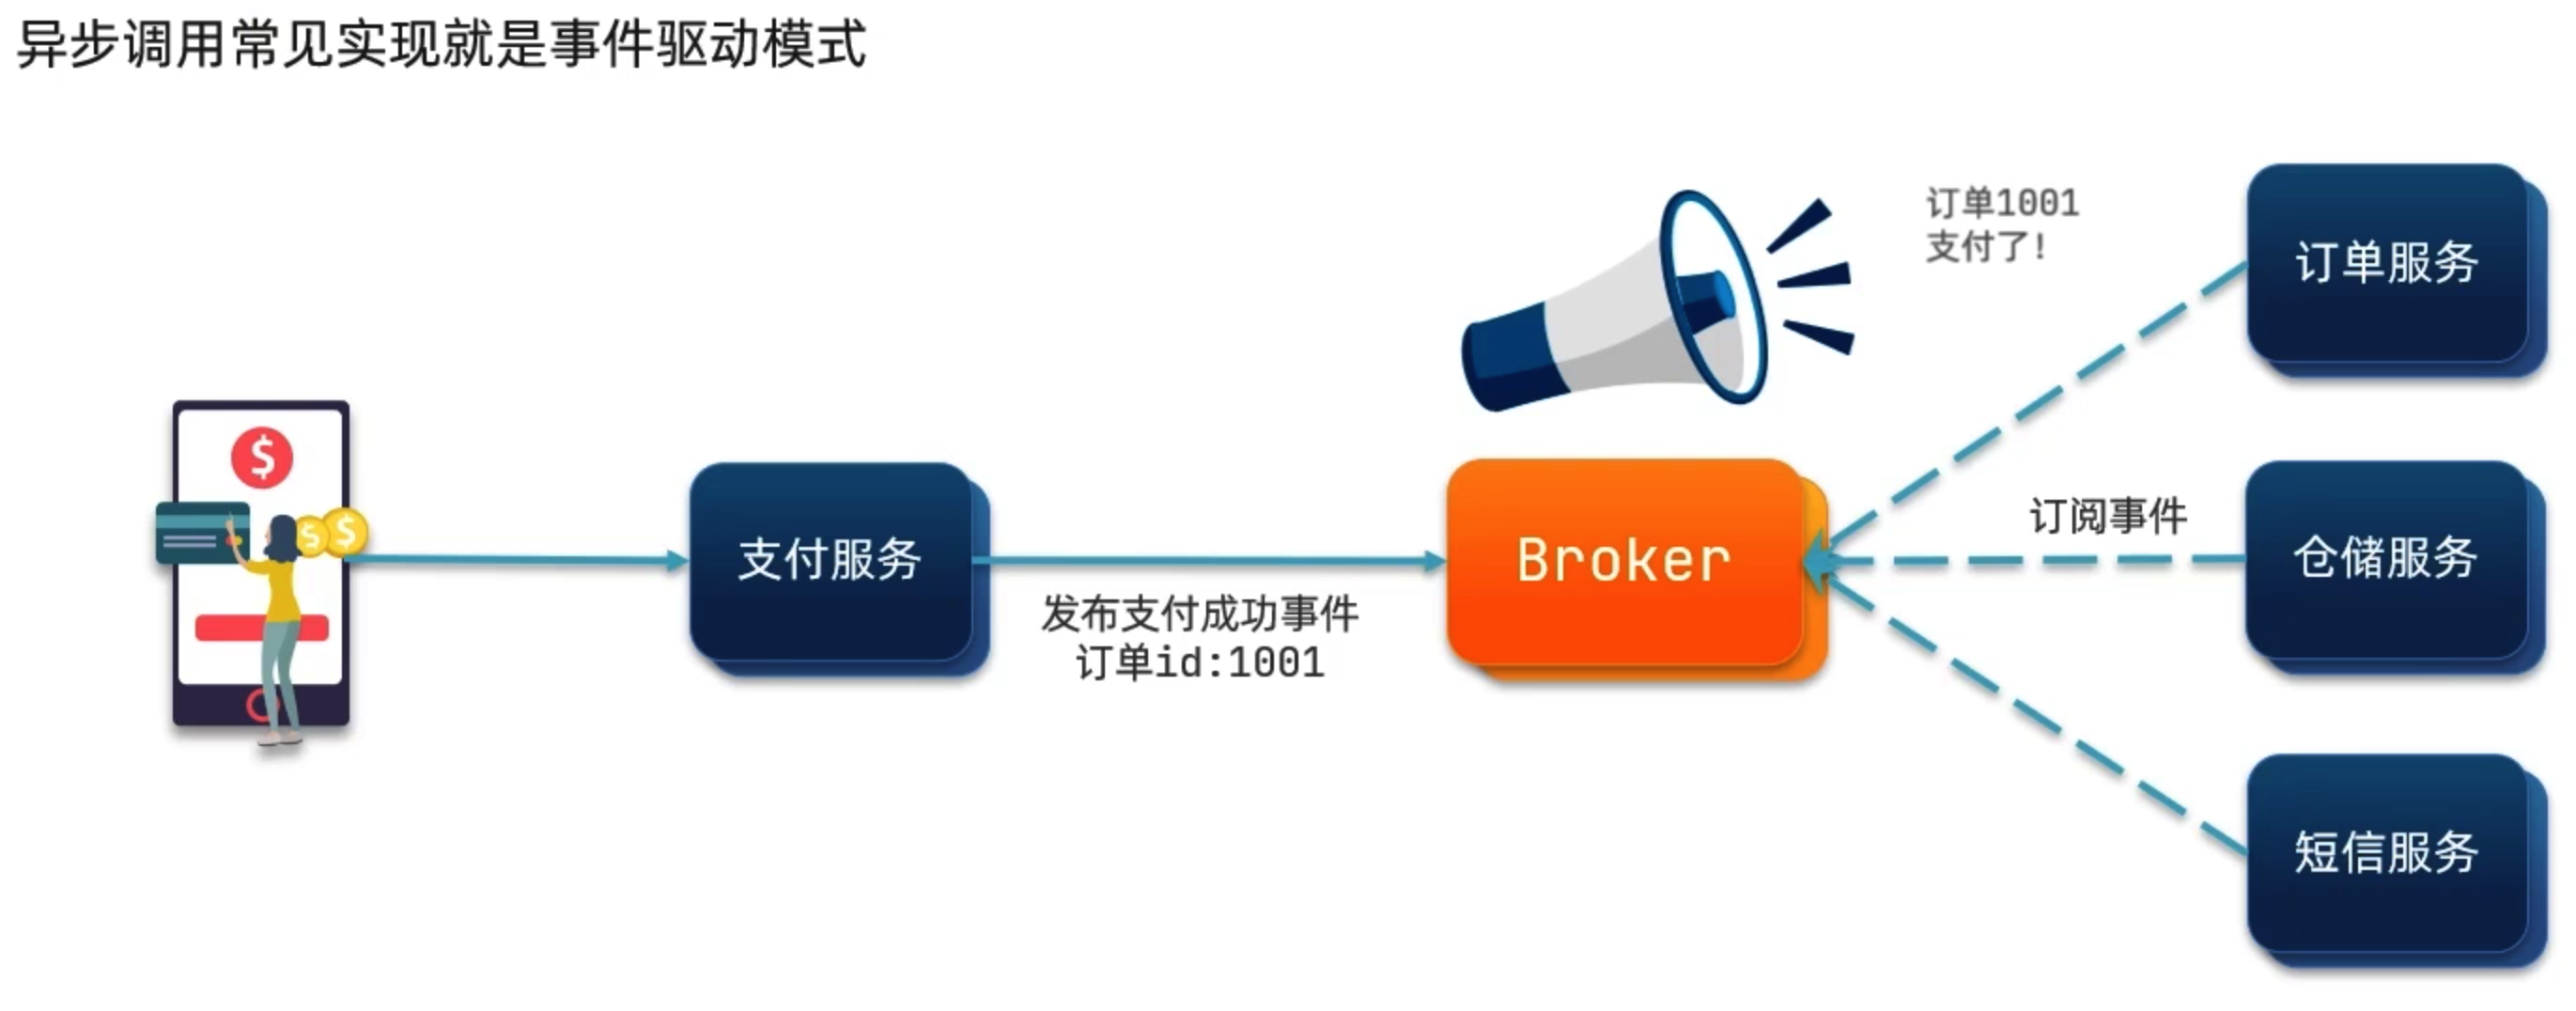
- Broker就是消息队列,只发消息
MQ
- MQ就是MessageQueue,消息队列,是事件驱动架构中Broker
安装
直接使用Docker进行安装
docker run \
 -e RABBITMQ_DEFAULT_USER=aomsir \
 -e RABBITMQ_DEFAULT_PASS=123456 \
 -v mq-plugins:/plugins \
 --name mq \
 -p 15672:15672 \
 -p 5672:5672 \
 -d \
 rabbitmq:3.8-management
实践
HelloWorld
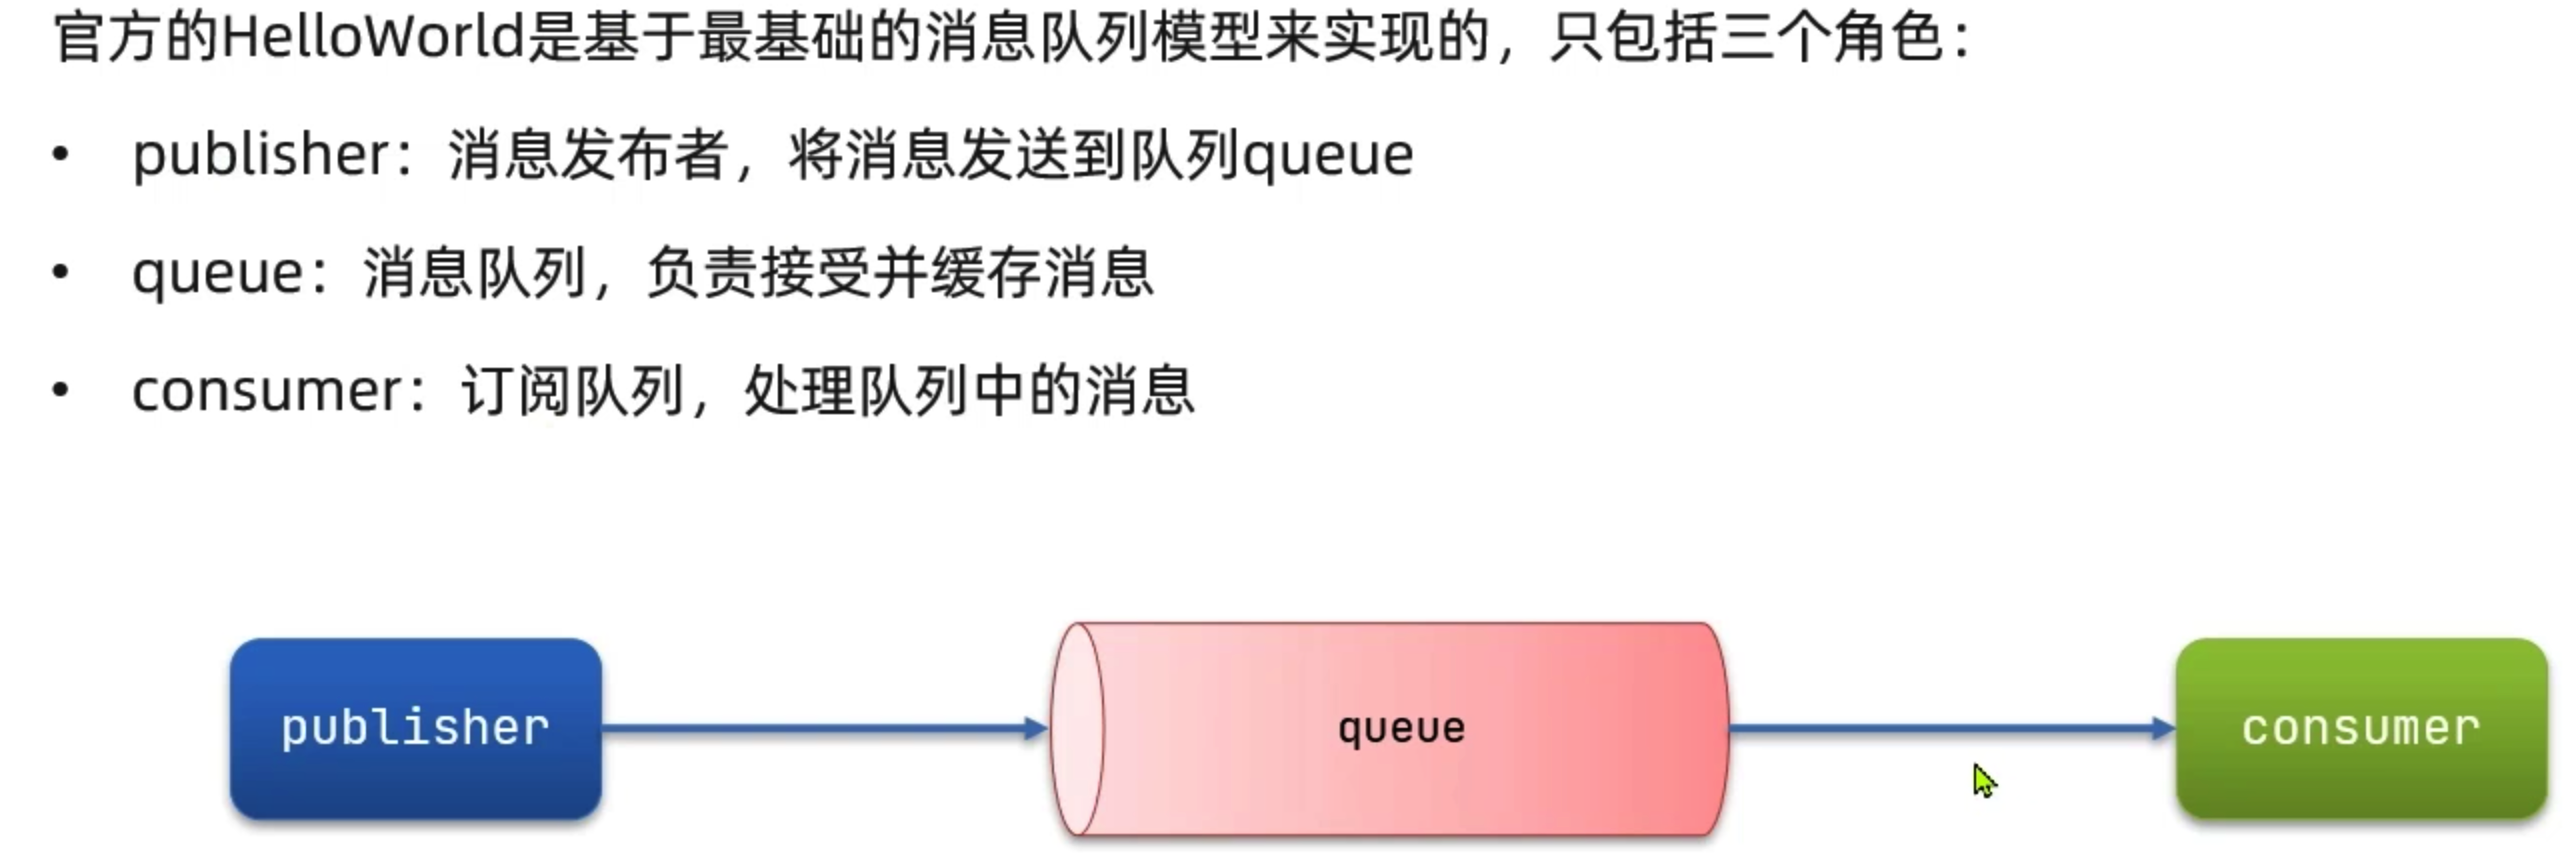
- 直接使用课程提供的demo
- 写两个测试类
public class PublisherTest {
    @Test
    public void testSendMessage() throws IOException, TimeoutException {
        // 1.建立连接
        ConnectionFactory factory = new ConnectionFactory();
        // 1.1.设置连接参数,分别是:主机名、端口号、vhost、用户名、密码
        factory.setHost("127.0.0.1");
        factory.setPort(5672);
        factory.setVirtualHost("/");
        factory.setUsername("aomsir");
        factory.setPassword("123456");
        // 1.2.建立连接
        Connection connection = factory.newConnection();

        // 2.创建通道Channel
        Channel channel = connection.createChannel();

        // 3.创建队列
        String queueName = "simple.queue";
        channel.queueDeclare(queueName, false, false, false, null);

        // 4.发送消息
        String message = "hello, rabbitmq!";
        channel.basicPublish("", queueName, null, message.getBytes());
        System.out.println("发送消息成功:【" + message + "】");

        // 5.关闭通道和连接
        channel.close();
        connection.close();

    }
}
public class ConsumerTest {

    public static void main(String[] args) throws IOException, TimeoutException {
        // 1.建立连接
        ConnectionFactory factory = new ConnectionFactory();
        // 1.1.设置连接参数,分别是:主机名、端口号、vhost、用户名、密码
        factory.setHost("127.0.0.1");
        factory.setPort(5672);
        factory.setVirtualHost("/");
        factory.setUsername("aomsir");
        factory.setPassword("123456");
        // 1.2.建立连接
        Connection connection = factory.newConnection();

        // 2.创建通道Channel
        Channel channel = connection.createChannel();

        // 3.创建队列
        String queueName = "simple.queue";
        channel.queueDeclare(queueName, false, false, false, null);

        // 4.订阅消息
        channel.basicConsume(queueName, true, new DefaultConsumer(channel){
            @Override
            public void handleDelivery(String consumerTag, Envelope envelope,
                                       AMQP.BasicProperties properties, byte[] body) throws IOException {
                // 5.处理消息
                String message = new String(body);
                System.out.println("接收到消息:【" + message + "】");
            }
        });
        System.out.println("等待接收消息。。。。");
    }
}
SpringAMQP
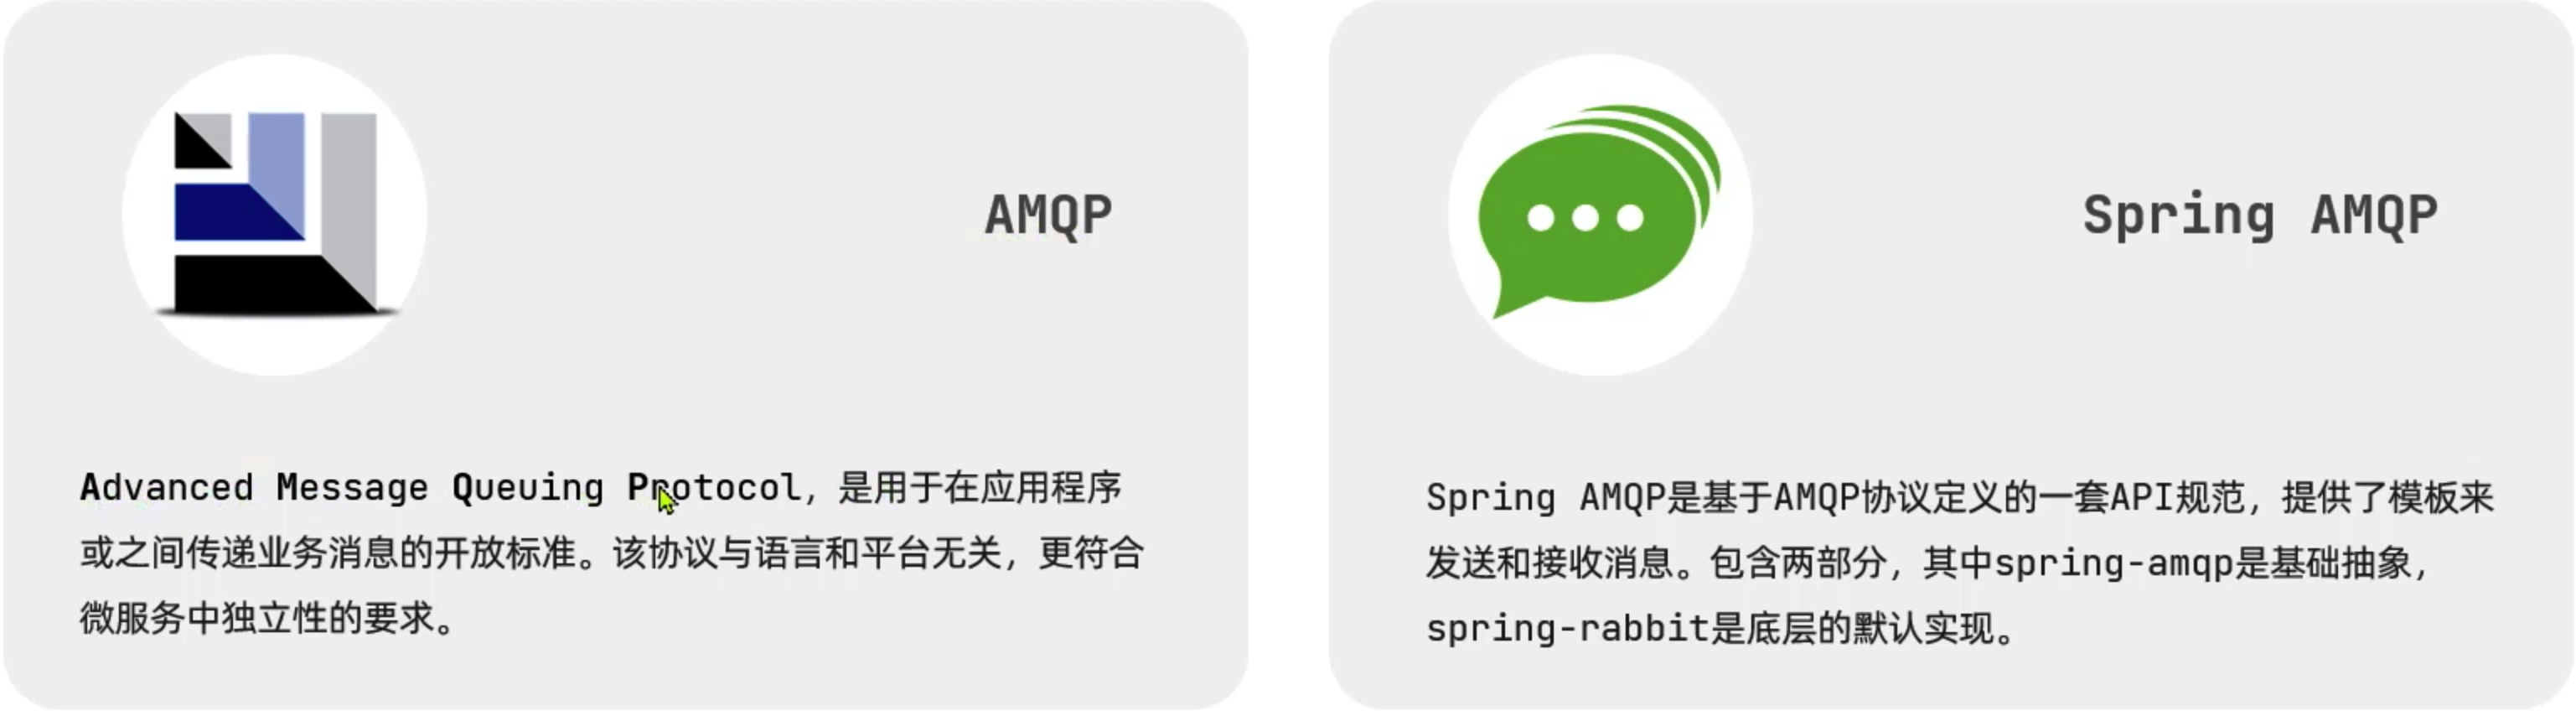
- 使用这个框架以后就可以简化MQ的使用,不向上面的操作那样
HelloWorld
- 引入依赖
- 写配置文件
- 消费者写监听配置类
- 写单元测试
<!--AMQP依赖,包含RabbitMQ-->
<dependency>
  <groupId>org.springframework.boot</groupId>
  <artifactId>spring-boot-starter-amqp</artifactId>
</dependency>
spring:
  rabbitmq:
    host: localhost
    port: 5672
    virtual-host: /
    username: aomsir
    password: 123456
@SpringBootTest
@RunWith(SpringRunner.class)
public class SpringAmqpTest {
    @Autowired
    private RabbitTemplate rabbitTemplate;

    @Test
    public void testSendMessage2SimpleQueue() {
        String queueName = "simple.queue";
        String message = "Hello, Spring AMQP";
        rabbitTemplate.convertAndSend(queueName, message);
    }
}
@Component
public class SpringRabbitListener {
    @RabbitListener(queues = "simple.queue")
    public void listenSimpleQueue(String msg) {
        System.out.println("消费者接收到simple.queue的消息:【"+ msg +"】");
    }
}
直接运行Application即可
WorkQueue
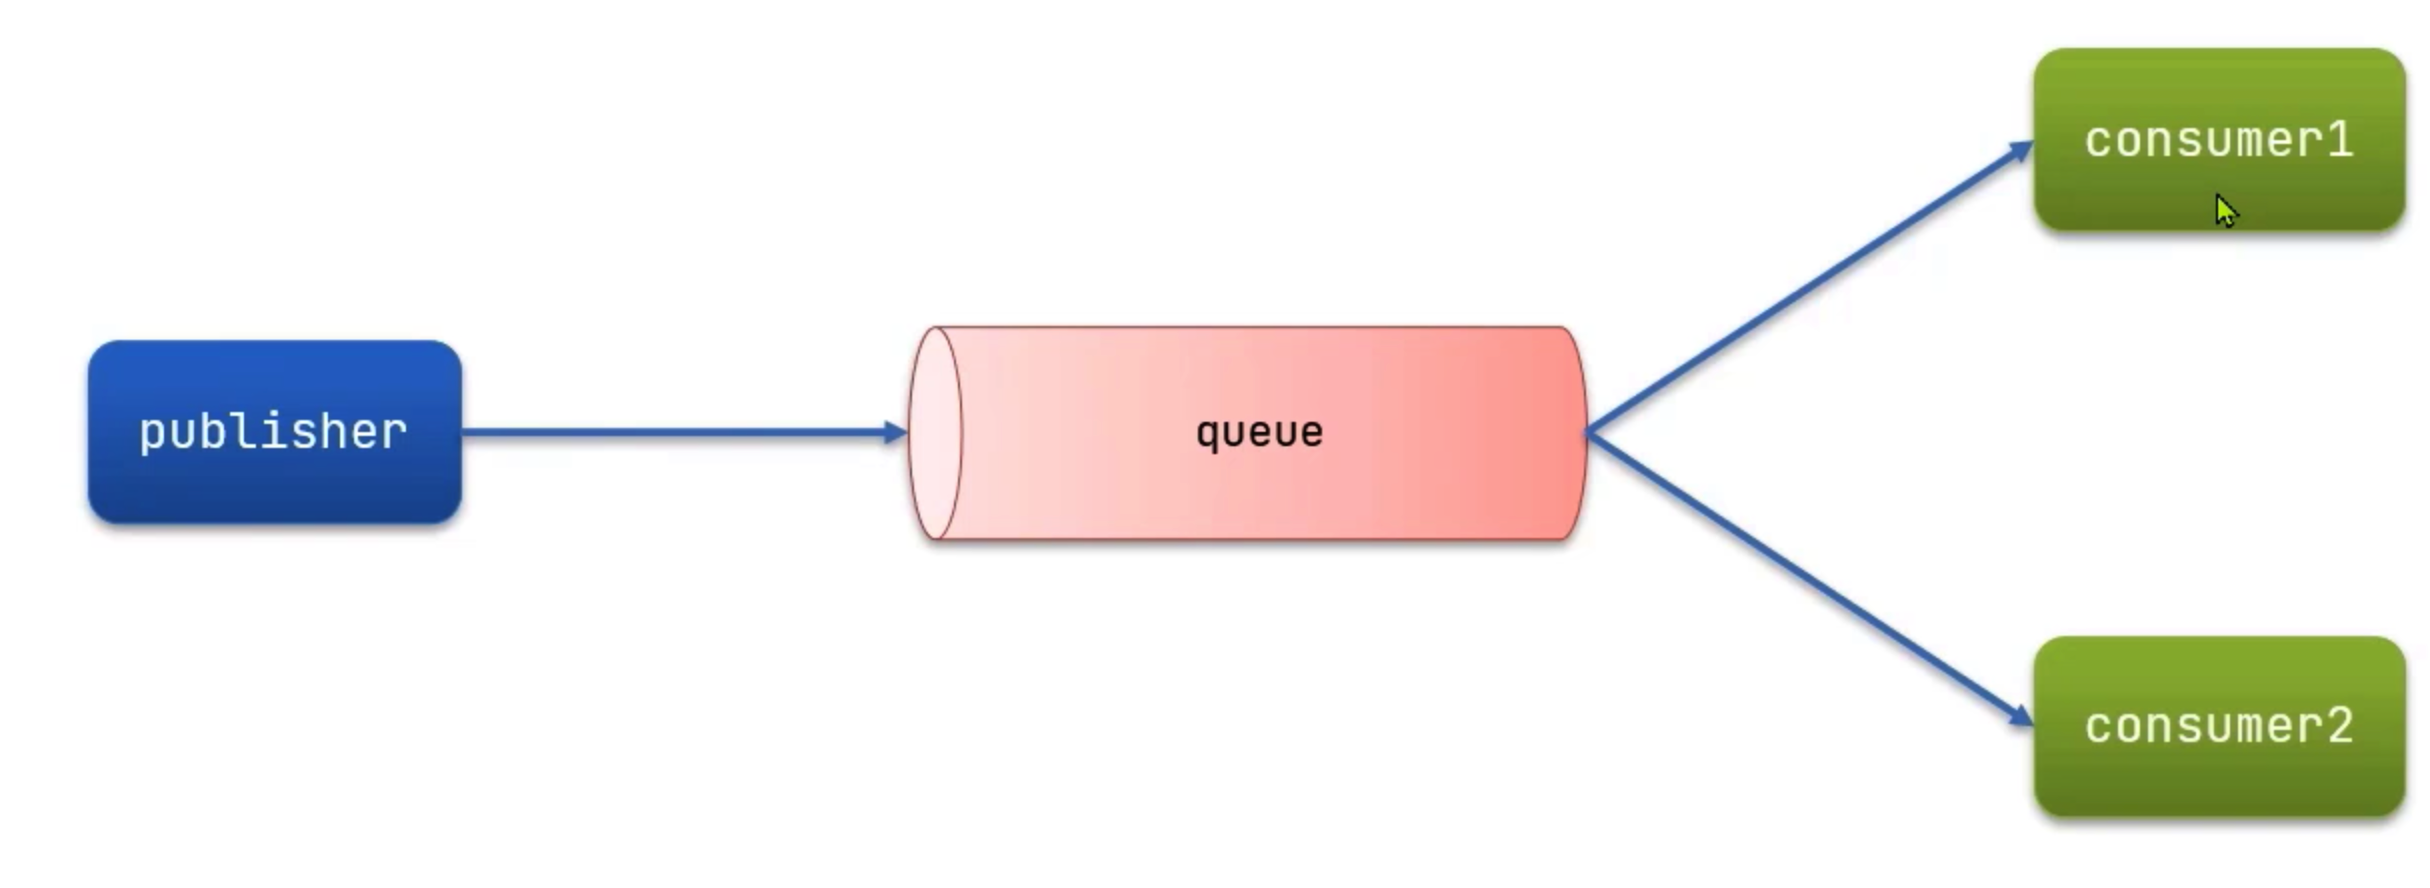
队列里的消息是阅后即焚的,只要有一个消费者接受救焚毁了
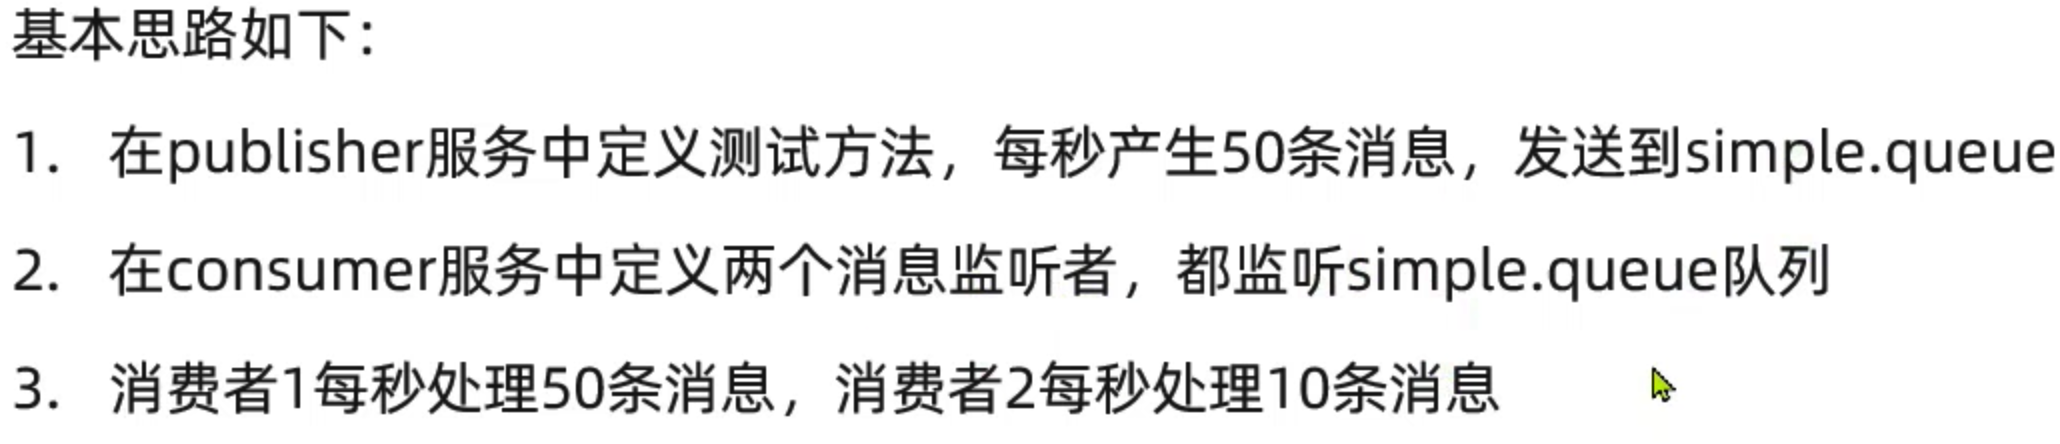
它的操作逻辑是轮询的,不会管你有没有处理完,所以会导致消费者堵塞,需要给消费者进行设置yml文件配置
- 这样的话时间就会压缩
@Component
public class SpringRabbitListener {

    @RabbitListener(queues = "simple.queue")
    public void listenWorkQueue1(String msg) throws InterruptedException {
        System.out.println("消费者1接收到simple.queue的消息:【"+ msg +"】" + LocalTime.now());
        Thread.sleep(20);
    }

    @RabbitListener(queues = "simple.queue")
    public void listenWorkQueue2(String msg) throws InterruptedException {
        System.out.println("消费者2接收到simple.queue的消息:【"+ msg +"】" + LocalTime.now());
        Thread.sleep(200);
    }
}
@Test
public void testSendMessage2WorkQueue() throws InterruptedException {
    String queueName = "simple.queue";
    String message = "Hello, message__";
    for (int i = 0; i < 50; i++) {
        rabbitTemplate.convertAndSend(queueName, message + i);
        Thread.sleep(20);
    }
}
logging:
  pattern:
    dateformat: MM-dd HH:mm:ss:SSS
spring:
  rabbitmq:
    host: localhost
    port: 5672
    virtual-host: /
    username: aomsir
    password: 123456
    listener:
      simple:
        prefetch: 1 # 每次只能得到一条消息,处理完ACK后才能够获取下一个消息
Publish/Subscribe
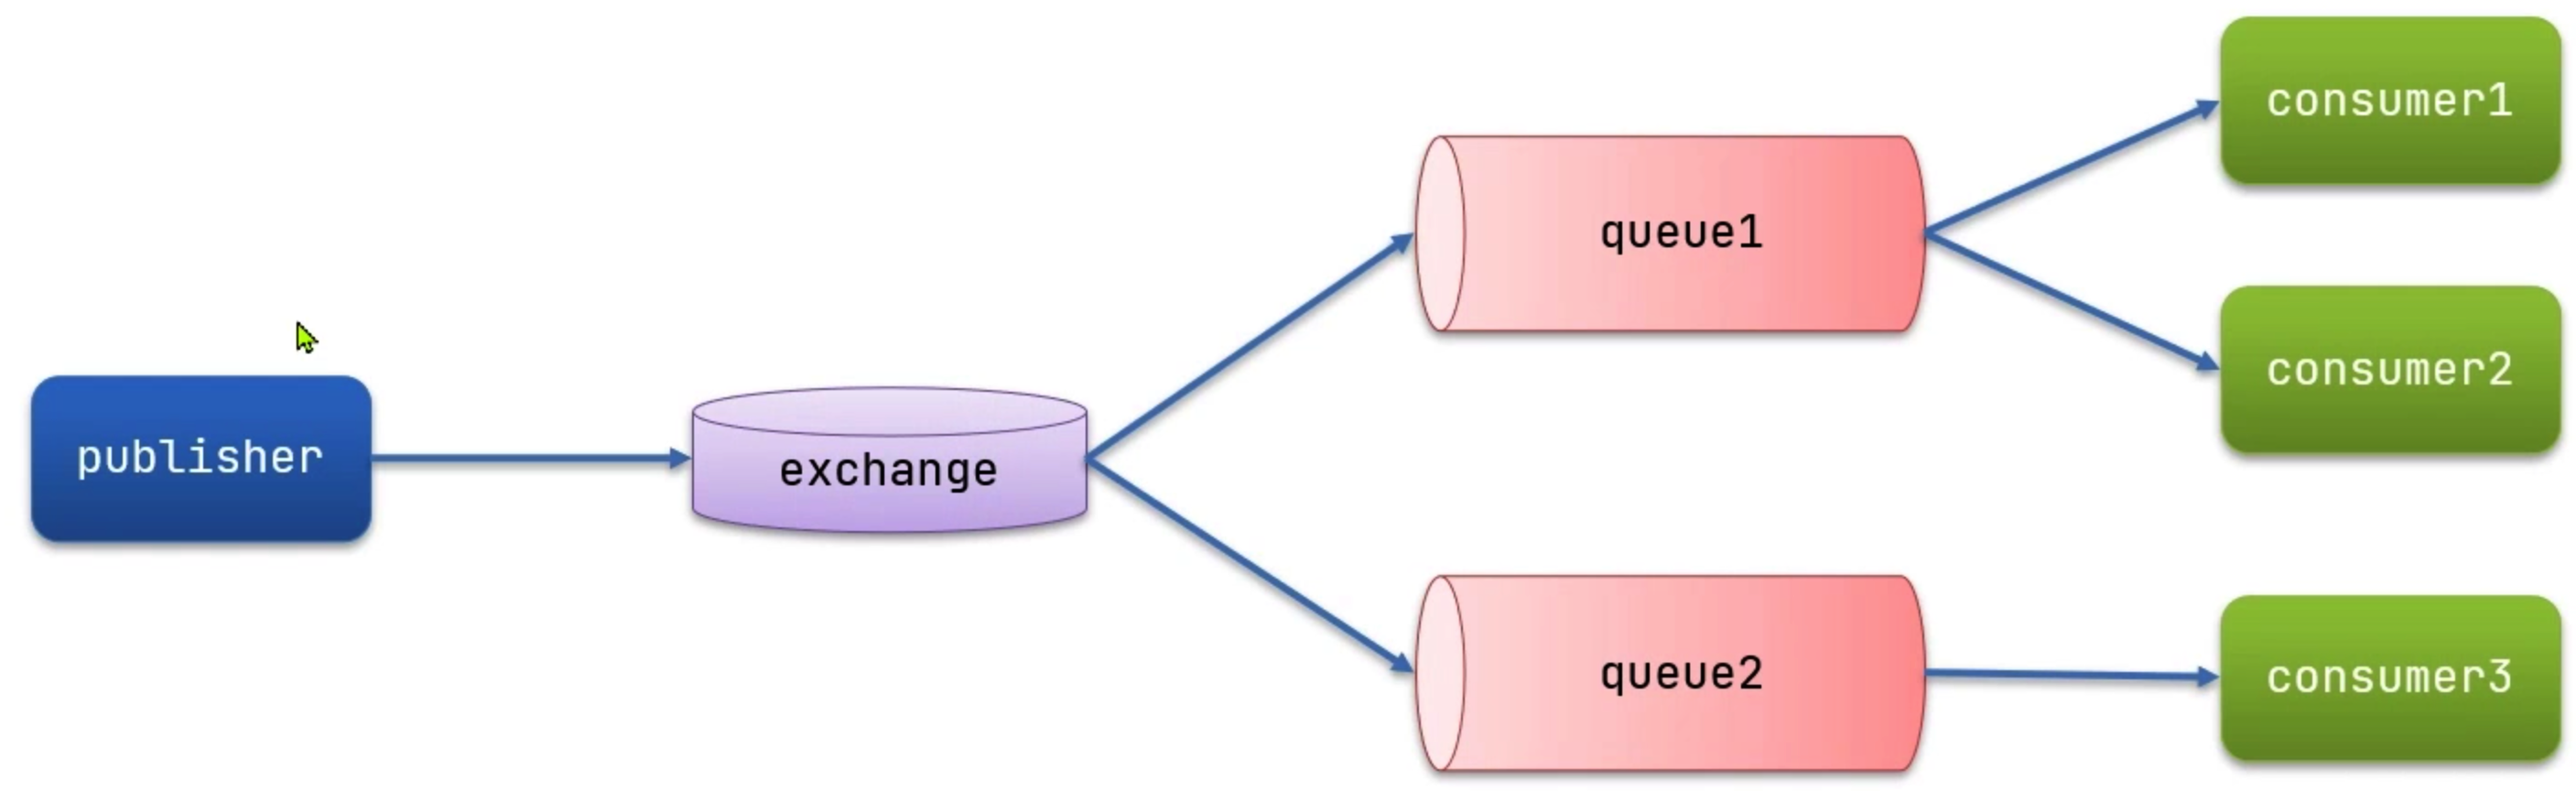
- 这是发布/订阅机制
- 和之前的区别就是:允许将同一条消息发送给多个消费者
- 实现方式:加入exchange交换机
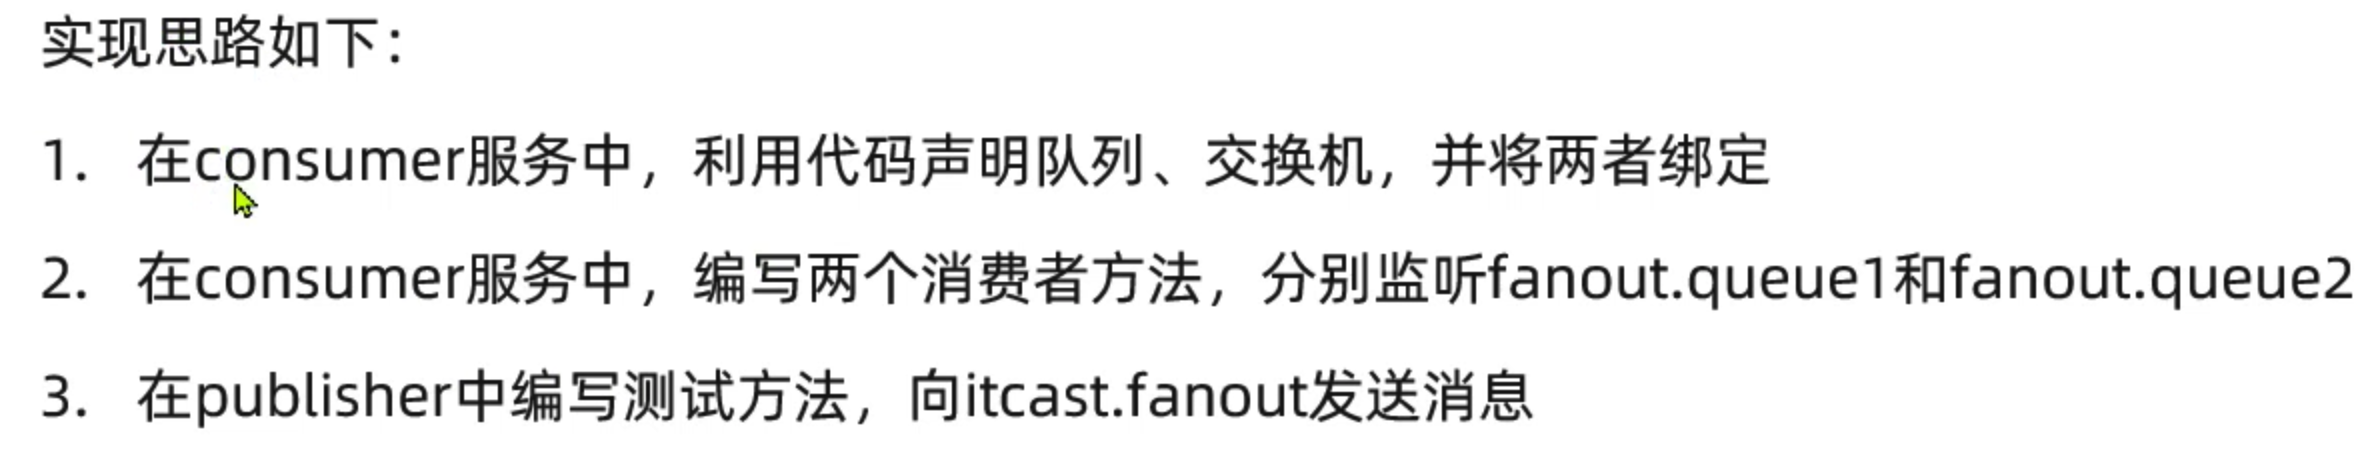
@Configuration
public class FanoutConfig {
    // 交换机
    @Bean
    public FanoutExchange fanoutExchange() {
        return new FanoutExchange("aomsir.fanout");
    }

    // 队列1
    @Bean
    public Queue fanoutQueue1() {
        return new Queue("fanout.queue1");
    }

    // 绑定交换机和队列1
    @Bean
    public Binding fanoutBinding1(FanoutExchange fanoutExchange,Queue fanoutQueue1) {
        return BindingBuilder
                .bind(fanoutQueue1)
                .to(fanoutExchange);
    }

    // 队列2
    @Bean
    public Queue fanoutQueue2() {
        return new Queue("fanout.queue2");
    }

    // 绑定交换机和队列2
    @Bean
    public Binding fanoutBinding2(FanoutExchange fanoutExchange,Queue fanoutQueue2) {
        return BindingBuilder
                .bind(fanoutQueue2)
                .to(fanoutExchange);
    }
}
@Component
public class SpringRabbitListener {

    @RabbitListener(queues = "fanout.queue1")
    public void listenFanoutQueue1(String msg) throws InterruptedException {
        System.out.println("消费者1接收到fanout.queue1的消息:【"+ msg +"】" + LocalTime.now());
        Thread.sleep(20);
    }

    @RabbitListener(queues = "fanout.queue2")
    public void listenFanoutQueue2(String msg) throws InterruptedException {
        System.out.println("消费者2接收到fanout.queue2的消息:【"+ msg +"】" + LocalTime.now());
        Thread.sleep(20);
    }
}
  @Test
public void testSendFanoutExchange() {
    // 交换机
    String exchangeName = "aomsir.fanout";

    // 消息
    String message = "Hello everyone!";

    // 发送消息到交换机
    rabbitTemplate.convertAndSend(exchangeName,"", message);
}
DirectExchange
- 发布订阅,交换机根据规则将消息路由到指定队列,称为路由模式

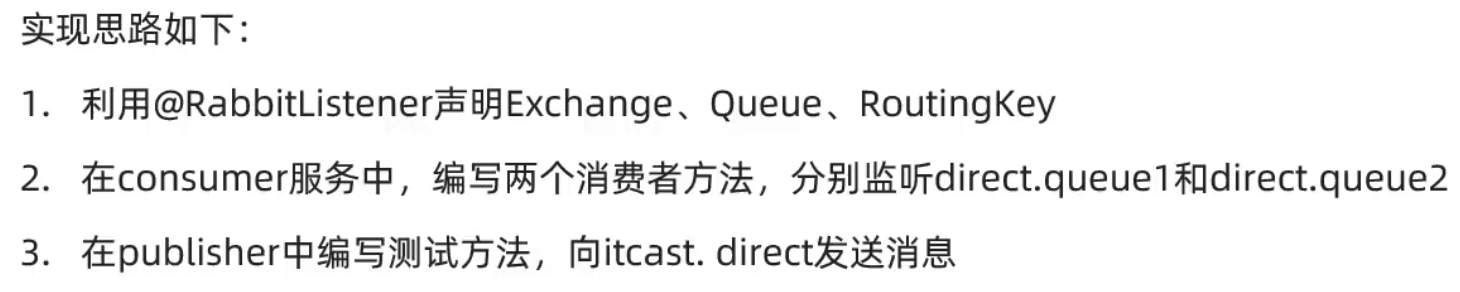
- 消费者直接使用注解的方式去声明交换机和绑定队列,不使用bean
- 发送消息的时候指定key
@Component
public class SpringRabbitListener {
@RabbitListener(bindings = @QueueBinding(
value = @Queue(name = "direct.queue1"),
exchange = @Exchange(name = "aomsir.direct", type = ExchangeTypes.DIRECT),
key = {"red","blue"}
))
public void listenDirectQueue1(String msg) {
System.out.println("消费者接收到direct.queue1的消息:【"+ msg +"】" + LocalTime.now());
}
@RabbitListener(bindings = @QueueBinding(
value = @Queue(name = "direct.queue2"),
exchange = @Exchange(name = "aomsir.direct", type = ExchangeTypes.DIRECT),
key = {"red","yellow"}
))
public void listenDirectQueue2(String msg) {
System.out.println("消费者接收到direct.queue2的消息:【"+ msg +"】" + LocalTime.now());
}
}
@SpringBootTest
@RunWith(SpringRunner.class)
public class SpringAmqpTest {
@Autowired
private RabbitTemplate rabbitTemplate;
@Test
public void testSendDirectExchange() {
// 交换机
String exchangeName = "aomsir.direct";
// 消息
String message = "Hello blue!";
// 发送消息到交换机
rabbitTemplate.convertAndSend(exchangeName,"yellow", message);
}
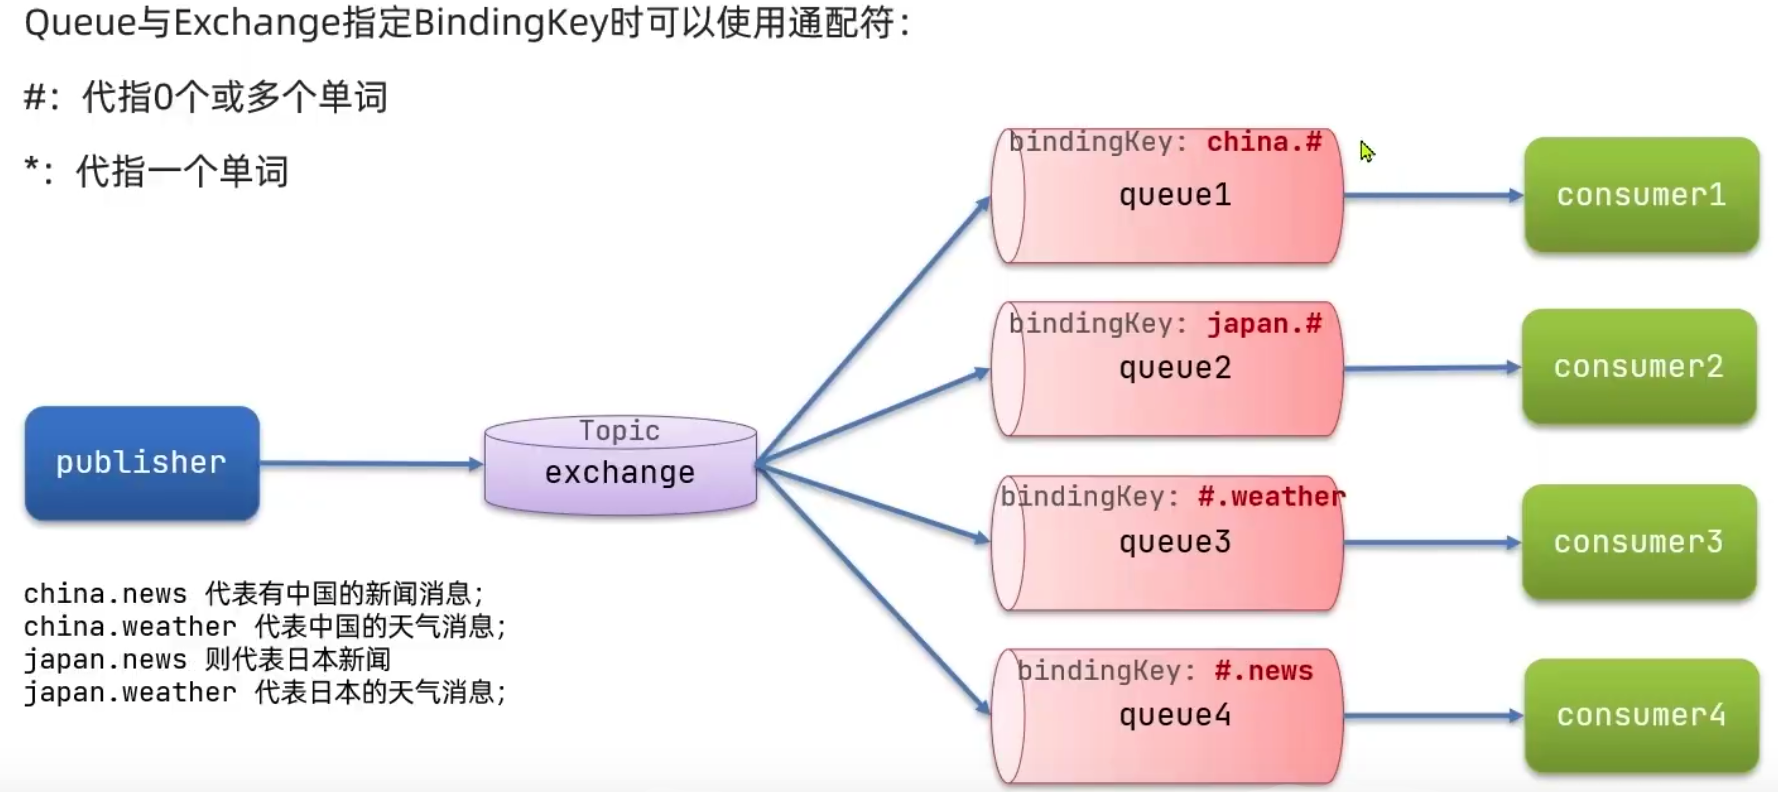
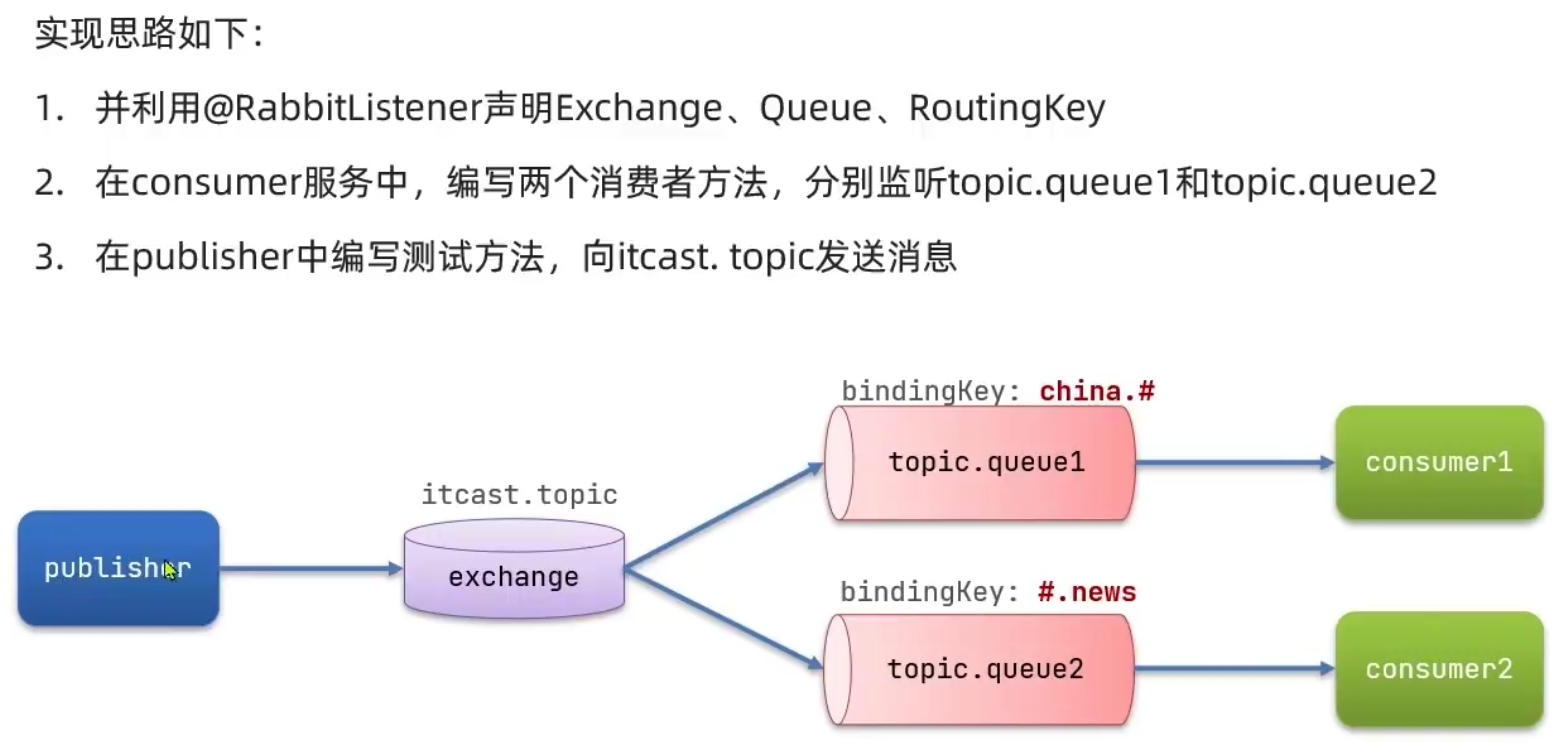
}TopicExchange
- 和DirectExchange类似,区别在于routingKey必须是多个单词的列表,并且以.切割
- 话题类型交换机
本博客所有文章除特别声明外,均采用 CC BY-NC-SA 4.0 许可协议。转载请注明来自 Jsckot的个人博客!
 微信
微信 支付宝
支付宝